In Windows 10, the default search function indexes your Internet Explorer history, Start Menu, and the entire users folder on the system partition. What if you want to add a network folder to the search index in Windows 10? For example, let’s say you have a NAS (network attached storage) device and you have a bunch of videos, pictures and files on there that simply won’t fit on your PC?
In this article, I’ll show you how to go about adding a network folder to the search index so that when you search for a file from Explorer, you will also get results that include files stored in the network folder.
Note: Technically speaking, the Windows client will not add a network location to the local search index. Instead, it will pass that search on to the server and the server will perform a search using its index. If you are trying to search a NAS device, it will perform the search in real-time, so the results will take some time to appear. If searching a Windows File server, you need to ensure that the search index on the server includes all desired locations.
Step 1 – Share Folder
The first thing you want to do is actually share the folder you want to include in the index. You’ll need to share the folder on your NAS or on the host machine, if it’s files stored on a Windows PC, for example. As an example, I wanted to include some files stored on my Windows 7 PC in the Windows 10 search index. These are the three test files I want to include:
So I went to Windows 7 and shared the folder by right-clicking and choosing Properties.
Then I clicked on the Sharing tab, Advanced Sharing, checked Share this folder, clicked on Permissions and gave Everyone Full Control. You obviously don’t have to give everyone full control, I’m just doing it here because it’s easier to setup.
Step 2 – Map Network Drive
Next you have to map the folder as a drive in Windows 10. You can do this by opening Explorer and then clicking on Network at the bottom. Find your NAS, file server or PC in the list and then double-click on it to see the shared folders.
Go ahead and click on the shared folder and then click on Easy access and Map as drive. Note that you can also just right-click on the folder and choose Map network drive. You’ll need to provide credentials to log into the file server or network PC.
Note that unless both machines have the same username and password, you’ll need to check the Connect using different credentials box and then type in the username and password for that computer or file server. Now when you go to computer, the mapped drive should be listed.
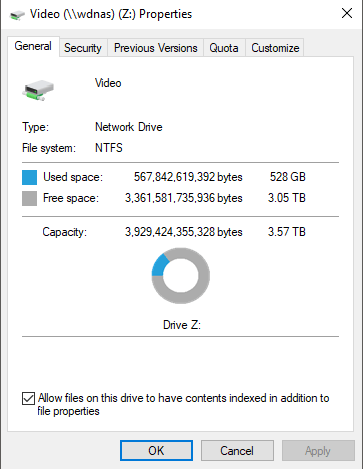
Now right-click on the network drive and click on Properties. At the bottom, make sure to check the Allow files on this drive to have contents indexed in addition to file properties.
Once you do this, the new files will be scanned and included in the Windows 10 search. Depending on how many files have been added, it could take some time before you start seeing the results. Now when I perform a search, I see files from my mapped NAS folder:
Sweet! Also, note that for certain file types like Word documents, it also indexes the contents of the files, so you can search inside text files, etc. As I mentioned earlier, these files aren’t being indexed in the local search index, though. If you click on Start and type in indexing options, you’ll see that the mapped network drive location is not listed nor can it be added.
Basically, it’s performing the search in real-time, which is why it’s going to be slow if you have a huge number of files on your network share. That’s about it! Also, be sure to check out my post on how to rebuild the search index in case you are not getting all the desired results when doing a search. If you have any problems with searching a network location in Windows 10, post a comment here and I’ll try to help. Enjoy!


Add Comment